Do you find that when starting a new freelance project, your ideas seem to go in a thousand directions? Do you need to shape them, but don’t want to waste time trying to organize everything?
Often, the solution is to look for simple tools that help you bring those thoughts into order, like a spider diagram.
No idea what it is or how to create a spider diagram?
That’s what we’re here for.
Below, you'll discover how to turn your ideas into a solid visual plan using a spider diagram.
Spider Diagram: The Tool That Helps You Organize Ideas
What Is a Spider Diagram?
It is a visual chart that starts with a central idea and branches out into different related concepts. Thanks to its structure, you can organize complex information, identify connections, and spot both opportunities and areas for improvement.
Its name comes from its design, which at first glance looks like a spider web. The central topic is placed in the middle, and branches extend out to link ideas, categories, or analysis criteria.
Note: in some technical contexts, the term "spider diagram" is also used to refer to radar charts. But in this article, we focus on the visual tool for organizing information, very similar to a mind map.
That’s why it’s worth highlighting the characteristics of a spider diagram:
It has a radial structure.
It’s highly adaptable.
It makes understanding a particular topic easier.
These qualities are what make it useful in various stages of the freelance process.
What Is a Spider Diagram Used For?
It serves to clearly and orderly visualize multiple ideas, categories, or criteria related to a specific topic.
In the freelance world, it can help you:
Organize ideas around a central theme.
Set priorities.
Visualize relationships between concepts.
Compare proposals.
Analyze skills, tasks, or available resources.
Present ideas clearly and quickly to a client.
Identify strengths and weaknesses in a project or proposal.
Analyze your own skills in different areas.
The spider diagram has a practical and flexible focus, which makes it easy to adapt to freelance work.
Benefits of Using a Spider Diagram
When ideas start spinning in your head, there’s nothing better than putting them in order. A concept map can help you rank concepts—there’s even a type called a spider map. But the diagram we’re talking about invites you to explore multiple directions at once.
Some of its key benefits include:
Processes ideas more visually: Instead of using lists or long paragraphs, this format shows you all the information at a glance, making it easier to understand complex topics.
Keeps your focus on what matters: It lets you see what you already know, what you need to strengthen, and how everything connects. If you juggle many areas as a freelancer, it’s incredibly useful.
Activates creative thinking: By structuring ideas non-linearly, it encourages unexpected connections and helps you find new solutions or approaches.
Adapts to any project: You can use it to plan, analyze, present ideas, or brainstorm. It works well in both creative processes and analytical tasks.
Supports decision-making: By comparing different areas or criteria in one chart, it’s easier to prioritize tasks, evaluate proposals, or break down problems into manageable parts.
Improves memory retention: Thanks to its visual structure, spider diagrams are easier to remember than traditional notes.
One thing this type of chart has in common with others—like Venn diagrams or flowcharts—is that it can be created quickly. The key is having a clear central topic.
When to Use a Spider Diagram
As a functional tool, the format adapts to many stages of freelance work. From the moment an idea arises to when you turn it into a proposal.
It’s ideal to use when you need to:
Unlock your mind during a brainstorming session: The chart starts from a central concept, so new ideas begin to appear almost effortlessly. This helps you find more accurate solutions.
Plan an article, script, or report: Simply outline the main topic, branch out key sections, and generate subtopics before writing. This prevents blocks and repetition.
Study or research a new topic: You can organize concepts, theories, or ideas to better understand the big picture and dig deeper where needed.
Solve complex problems: Map out possible causes and effects to analyze alternatives and choose the best path forward.
Take smarter notes: Whether you’re in a meeting, watching a course, or reading an article, use a spider diagram to retain the most relevant points.
Prepare visual presentations: Create a clear outline that serves as a base for a simple but impactful explanation to capture a client’s or team’s attention.
Once you know how to make a spider diagram, it’s smart to use it in these situations. You’ll see how it helps bring order to the chaos and reveals connections you hadn’t seen before.
Spider Diagram Use Cases
Given its versatility and the ability to create spider diagrams online, it can be applied in various fields:
Education: Both students and educators use it to analyze complex topics, connect ideas, and facilitate the retention of key concepts. It’s great for preparing summaries, presentations, or reviewing before an exam.
Business: The diagram helps visualize project components, identify risks, define key tasks, and outline clear objectives. It’s especially useful in planning sessions, company diagnostics, or marketing strategy development.
Design: Designers, marketers, and content creators use it to plan everything from user experience to full campaigns. It’s a simple way to ensure no important point is left out.
Research: This chart organizes scattered information around a main axis. It makes it easier to find patterns, group variables, or discover relationships that weren’t obvious at first.
Communication: If your audience needs to grasp a complex idea in seconds, a spider diagram can be the perfect visual support
It works well in presentations, team meetings, or client proposals.
How to Create a Spider Diagram Step-by-Step
Designing a spider diagram doesn’t require many steps, and it’s not complicated. Even less so if you use a platform to create spider diagrams online. The key is to be clear on the topic you want to explore.
Here are the steps:
1. Choose the main topic
Think about the central idea you want to explore. It could be:
A project.
A problem.
A concept.
A question.
Write it in the center of your paper or screen and enclose it in a shape (usually a circle).
2. Add subtopics
From the center, draw lines outward and write a category or related subtopic on each. These are the diagram's main branches.
3. Develop secondary ideas
From each subtopic, extend new lines to add details, examples, or more specific ideas.
This helps you dive deeper into each part of the topic.
4. Connect and organize
You can link concepts that are related, even if they’re on different branches. Use lines, arrows, or colors to show these connections.
5. Review and adjust
Go over the whole diagram and make sure the information is clear, complete, and well-distributed. If something doesn’t fit or is missing, adjust freely. As mentioned, this diagram is flexible.
6. Customize if needed
Add colors, symbols, or different line types if they help you distinguish ideas better. These details can also aid comprehension if you're going to share the diagram.
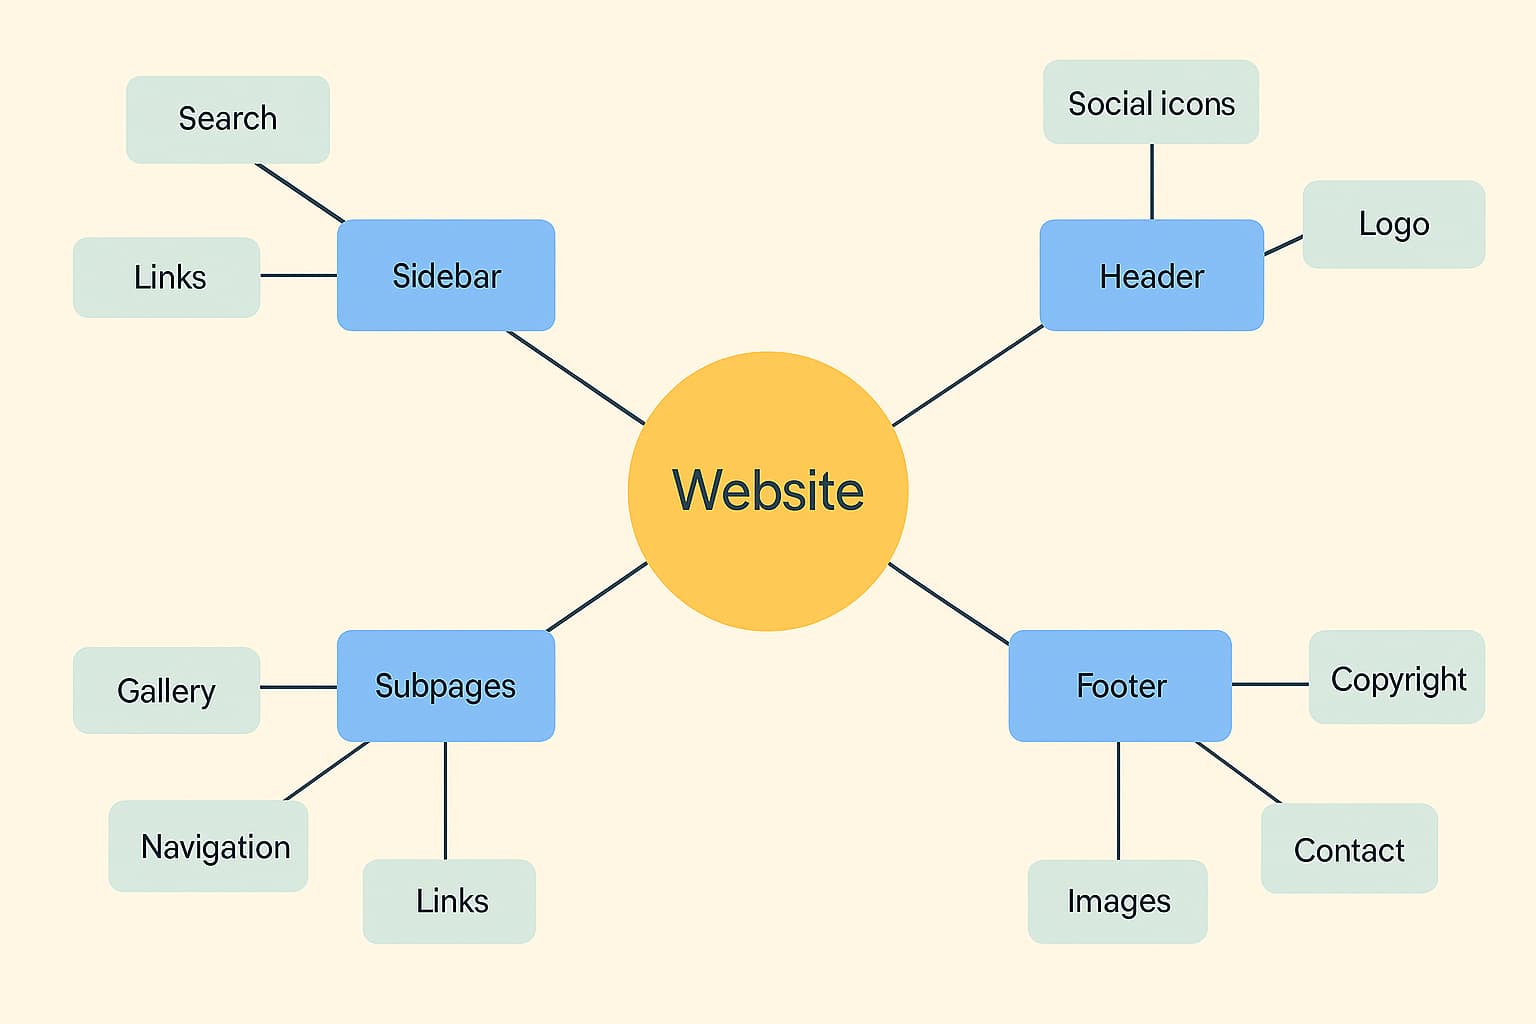
Here is an example of a spider diagram:
As you see in the image, each color represents a different subtopic, with connected ideas that help develop or explore each point.
Tips to Create an Effective Spider Diagram
A good diagram helps you think better and clearly communicate what you want, aside from looking visually appealing.
If you want to achieve that, try these tips:
Start with a clear intention: First ask yourself, why am I designing this diagram? Is it to generate ideas, plan something, explain a topic, or solve a problem? Once you know, you can stay focused.
Build on key ideas: You don’t have to include everything. Just select categories or key points that add value to what you’re developing. From there, the rest will flow naturally.
Draw logical connections, not just lines: It's not just about linking one point to another; each relationship should have a reason. Consider how the idea relates to the previous one. Is it an example, a cause, or a consequence?
Use color purposefully: Choose colors that match your style to group, highlight, or differentiate. These details help you process information faster and spot patterns effortlessly.
Less is more: Avoid overcrowding your spider diagram with too many elements. You want it to be clear, not confusing.
This will help you organize information in a balanced way.
Conclusion
Beyond knowing how to make a spider diagram, you should understand the benefits it can bring to your freelance profession. Whether you work in content, design, consulting, or any other service, it’s a useful technique for structuring ideas.
Its visual and flexible format lets you organize the complex and discover connections that often go unnoticed.
You don’t need fancy tools to create one. Just have a clear purpose and let your ideas expand from a central point.
To wrap up, we recommend using DolarApp as a payment method to speed up your international transactions. Our app is designed to send or receive money in euros or digital dollars.
Plus, with DolarApp you avoid high banking fees when converting your money. Instead, you can buy or sell USDc or EURc at a fair exchange rate with no additional costs.
Discover a world without borders.
The world has borders. Your finances don’t have to.

 Freelancer tips